Year 5 Week 5 Visual Art Activity
Parents, just a quick message to let you know that this activity will require parental supervision. Also, please only use the resources that you may already have at home.
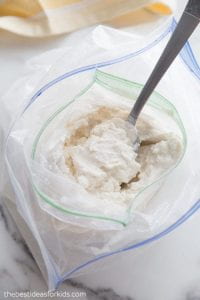
How to make ice-cream in a bag
Learning Intention: After the students have completed the lesson they will be able to: Explain the effect of salt and ice, and compare and contrast what happened to the ice-cream in the bag with salt and sugar and differences between the two.
Success Criteria: After the experiment students should be able to explain in their own words the process of making ice cream in a bag, and the differences when using ice and salt and the effect it has on the process of ice cream making and why?
Record , draw and discuss these findings with an adult and don’t forget to share.
Using just a few ingredients you can make your ice-cream at home. We are currently learning and playing with simple kitchen science experiments. Why kitchen science? because everything you need is already in your kitchen cupboards. There are so many cool experiments to do at home with everyday household items. This experiment is sure to develop a love for not only being creative in art , but also learning through science. Have lots of fun kids and please remember to film, share and upload your work via email and/or google doc.
REMEMBER GET CREATING!
Materials
- 1/4 cup sugar
- 1/2 cup milk
- 1/2 cup whipping cream (heavy cream)
- 1/4 teaspoon vanilla or vanilla flavoring (vanillin)
- 1 (quart) zipper-bag
- 1 (gallon) zipper-bag
- 2 cups ice
- Thermometer
- 1/2 to 3/4 cup sodium chloride table salt or rock salt
- Measuring cups and spoons
- Cups and spoons for eating your treat
Procedure
- Add 1/4 cup sugar, 1/2 cup milk, 1/2 cup whipping cream, and 1/4 teaspoon vanilla to the zipper bag. Seal the bag securely.
- Put 2 cups of ice into a plastic bag.
- Use a thermometer to measure and record the temperature of the ice in a bag.
- Add 1/2 to 3/4 cup salt (sodium chloride) to the bag of ice.
- Place the sealed zipper bag inside the zipper bag of ice and salt. Seal the gallon bag securely.
- Gently rock the zipper bag from side to side. It’s best to hold it by the top seal or to have gloves or a cloth between the bag and your hands because the bag will be cold enough to damage your skin.
- Continue to rock the bag for 10-15 minutes or until the contents of the zipper bag have solidified into ice cream.
- Open the zipper bag and use the thermometer to measure and record the temperature of the ice/salt mixture.
- Remove the zipper bag, open it, serve the contents into cups with spoons.
The Science Behind Making Ice-cream and how it changes from becoming a liquid to a solid!
Contact Details:
Teresa Velardi (Art Teacher)
tvelardi@stgeorgepreca.catholic.edu.au


